概述
Dart是一个单线程的语言,遇到有延迟的运算(比如IO操作、延时执行)时,线程中按顺序执行的运算就会阻塞,用户就会感觉到卡顿,于是通常用异步处理来解决这个问题。当遇到有需要延迟的运算(async)时,将其放入到延迟运算的队列(await)中去,把不需要延迟运算的部分先执行掉,最后再来处理延迟运算的部分。和 Java 中的多线程不同,dart 采用的基于事件的异步模型。简单说就是在某个单线程中存在一个事件循环和一个事件队列,事件循环不断的从事件队列中取出事件来执行,因此,耗时事件不会阻塞整个事件循环,这让它后面的事件也会有机会得到执行。讲到这里,你想起来什么了么。对!Android 中的多线程 Handler/Looper 也是采取这个模式!
async 和 await
async 和 await 在项目中的耗时操作有很大应用空间,例如登陆等待操作、网络请求操作。下面我们利用官方文档来具体说明 async 的用途和具体执行流程
1 | import 'dart:async'; |
其中,gatherNewsReport 执行耗时操作,如果不将这个函数进行异步处理,代码执行将会受到阻塞。当使用了异步处理之后,执行顺序如下图所示:
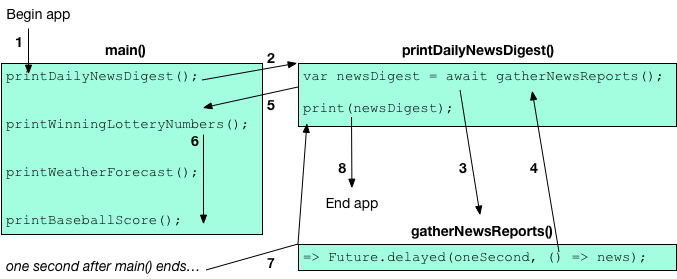
可以看到,程序的执行顺序如下
- 程序开始执行
- main 函数同步执行
printDailyNewsDigest()这个异步函数 printDailyNewsDigest()利用 await 关键词调用gatherNewsReports()耗时操作,并开始执行.gatherNewsReports()函数返回一个未完成的 future (一个Future<String>实例).- 因为
printDailyNewsDigest()是一个异步函数并且正在 await 一个返回值, 他暂停执行并给调用它的main函数返回一个未完成的 future (在这个例子中, 是一个Future<void>实例) - 剩余的 print 函数被执行,由于他们是同步的,每个函数都可以在下一个函数调用之前被完全执行.
- 当
main()函数结束, 异步函数被重新执行. 首先, gatherNewsReports() 返回一个已经完成确定的future值(Future<String>). 随后printDailyNewsDigest()函数继续执行打印 news. - 当
printDailyNewsDigest()函数执行完毕, 给 main 函数返回的 future(Future<void>)也完成了, app 退出.
关于异步的讨论,我们在这里先告一段落,之后会更详细的了解,现在只需要知道执行的顺序。下面我们来说一说 firebase。
firebase
Firebase 让移动端应用具有访问后端服务的能力,包括鉴权、存储、数据库以及无服务器托管的服务。国内的话应该类似于 Bmob 系统,不过感觉 firebase 网络体验要差一些,毕竟谷歌的东西。
第一次配置firebase,首先要注册一个firebase账号,如果有的话直接登录就可以。接下来步骤依次是
- pubspec.yaml,添加 cloud_firestore 依赖包并保存(如果出现问题打开
android/app/build.gradle,然后找到 minSdkVersion 16 这一行,把这一行改为 minSdkVersion 21,并保存文件。) - 在你的 Firebase console 中,点击 Add project,新建一个 Firebase 项目;
- 在 Flutter 项目目录中,打开文件
android/app/src/main/AndroidManifest.xml;在 manifest 中,找到 package 属性中的值,它代表的是 Android 的包名(类似于 com.yourcompany.yourproject 这样的)复制这个值;这个值填入 package name; - 点击 Register App;在 Firebase 中按照里面的步骤下载 google-services.json 文件;回到 Flutter 应用目录,将 google-services.json(就是你刚刚下载的文件)放入到 android/app 目录中;
- 在 IDE 或者编辑器中,打开 android/app/build.gradle 文件,然后将下列这一行粘贴到文本中:
1 | apply plugin: 'com.google.gms.google-services' |
打开 android/build.gradle 文件,然后在里面的 buildscript 标签下,新增一个依赖:
1
2
3
4
5
6
7
8
9
10
buildscript {
repositories {
// ...
}
dependencies {
// ...
classpath 'com.google.gms:google-services:3.2.1' // new
}
}在 cloud firestore 中添加自己的数据集
获取数据
1 | Widget _buildBody(BuildContext context) { |
当然,在这之前别忘了导入包。然后我们利用 Firestore.instance.collection('user').snapshots() 语句得到对应的数据集,即声明中的Collection,将这些文件传给snapshot
1 | //读取firebase数据 |
首先我们定义了DocumentSnapshot类型变量,随后核心代码
1 | l = snapshot.map((data) => ds = data).toList(); |
(data)相当于一个迭代器(这个语法查了半天才知道),随后我们将snapshot中存储的DocumentSnapshot 转换为 List 类型,方便我们读取。
在此之前,我们要定义一个接受数据的类型,在我的项目里定义了一个 Record 类型,来存储 firestore 中的数据类型 userName 和 passWord,代码如下
1 | class Record { |
最后,为了方便在程序中使用,我们建立了一个 Map ,首先将我们需要的数据(在这个项目中是用户名和密码)加入 Map ,来使得数据之间通过映射关系可以相互查找,
码那么多字好累啊,加油干!