网络连接基本
对于 Android 中的网络问题, 我们要着重学习其中的工作原理,这篇文章主要来说一说 Android 自己的库中,是怎样利用 Http 协议请求数据的。
1
2
3
4
5
6
7
8
9
10
11
12
13
14
15
16
17
18
19
20
21
22
| public byte[] getUrlBytes(String urlSpec) throws IOException{
URL url = new URL(urlSpec);
HttpURLConnection connection = (HttpURLConnection) url.openConnection();
try{
ByteArrayOutputStream out = new ByteArrayOutputStream();
InputStream in = connection.getInputStream();
if(connection.getResponseCode() != HttpURLConnection.HTTP_OK){
throw new IOException(connection.getResponseMessage() +
":with " +
urlSpec);
}
int bytesRead = 0;
byte[] buffer = new byte[1024];
while((bytesRead = in.read(buffer)) > 0){
out.write(buffer, 0, bytesRead);
}
out.close();
return out.toByteArray();
}finally {
connection.disconnect();
}
}
|
getUrlBytes(String)方法能从指定URL获取原始数据并返回一个字节流数组。getUrlString
(String)方法则将getUrlBytes(String)方法返回的结果转换为String。
在 getUrlBytes( String ) 方法中,首先根据传入的字符串参数,如 https://www.baidu.com (顺带提一句,http后面的s时一定要加的),创建一个 URL对象。然后调用 openConnection() 方法创建一个指向要访问URL的连接对象。URL.openConnection() 方法默认返回的是 URLConnection 对象, 但要链接的是http URL, 因此需将其强制类型转换为 HttpURLConnection 对象。这让我们得以调用他的 getInputStream() 、getResponseCode() 方法。
虽然 HttpURLConnection 对象提供了一个连接欸, 但只有调用 getInputStream() 方法时(如果是 POST 请求, 则调用 getOutputStream() 方法), 它才会真正连接到指定的URL地址,才会给你反馈代码。
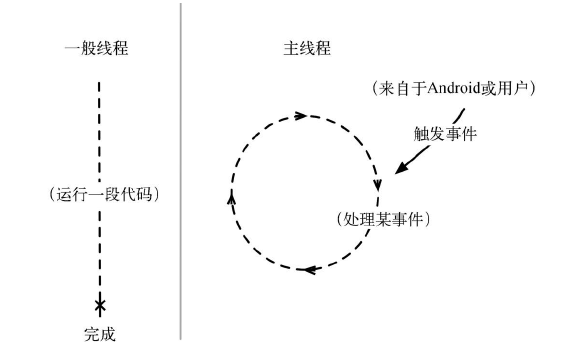
AsyncTask 在后台线程上运行代码
首先在主程序中创建一个内部类来声明 AsyncTask 工具类,定义自己要在线程中做什么耗时操作
1
2
3
4
5
6
7
8
9
10
11
12
| private class FetchItemsTask extends AsyncTask<Void, Void, Void>{
@Override
protected Void doInBackground(Void... params){
try{
String result = new FlickrFetchr().getUrlString("https://www.baidu.com");
Log.i(TAG,"Fetched contents of URL:" + result);
} catch(IOException ioe){
Log.e(TAG,"Failed to fetch URL:", ioe);
}
return null;
}
}
|
随后,我们在 fragnment 主程序中调用 让AsyncTask在后台运行
1
2
3
4
5
6
| @Override
public void onCreate(@Nullable Bundle savedInstanceState) {
super.onCreate(savedInstanceState);
setRetainInstance(true);
new FetchItemsTask().execute();
}
|
调用 execute() 方法会启动 AsyncTask, 进而触发后台线程并调用 doInBackground(...)方法。
Android中的线程
Android中的线程
关于线程的详细说明,会在下一篇中展开介绍,JSON解析有待补充
网络中 JSON 解析
当浏览器向服务器请求数据时,成功之后服务器会返回数据,这个数据的格式多种多样,其中有XML,HTML,JSON,在这里面我们用 JSON 举个例子。请看下面代码
1
2
3
4
5
6
7
8
9
10
11
12
13
14
15
16
17
18
19
20
21
22
23
| public List<GalleryItem> fetchItems(){
List<GalleryItem> items = new ArrayList<>();
try{
String url = Uri.parse("https://api.flickr.com/services/rest/")
.buildUpon()
.appendQueryParameter("method", "flickr.photos.getRecent")
.appendQueryParameter("api_key", API_KEY)
.appendQueryParameter("format", "json")
.appendQueryParameter("nojsoncallback", "1")
.appendQueryParameter("extras", "url_s")
.build().toString();
String jsonString = getUrlString(url);
Log.i(TAG, "Received JSON: " + jsonString);
JSONObject jsonBody = new JSONObject(jsonString);
parseItems(items, jsonBody);
}catch (IOException ioe){
Log.e(TAG, "Failed to fetch items???", ioe);
} catch (JSONException je) {
Log.e(TAG, "Failed to parse", je);
}
return items;
}
|
从程序上来看,我们首先构建了请求URL,随后 getURLString() 来获取返回的数据,官方的API中含有getRecent方法, 我们首先指定请求的具体方法,然后输入ID来获取请求资格, 注意,有些网页默认返回 XML 格式数据,我们需要指定 format 为 json。
当然,我们现在获取的 JSON 是乱糟糟的一坨,我们需要从这里面找到我们真正需要的数据,请看下面代码
1
2
3
4
5
6
7
8
9
10
11
12
13
14
15
16
17
18
19
20
21
22
23
24
|
private void parseItems(List<GalleryItem> items, JSONObject jsonBody)
throws IOException, JSONException{
JSONObject photosJsonObject = jsonBody.getJSONObject("photos");
JSONArray photoJsonArray = photosJsonObject.getJSONArray("photo");
for(int i = 0; i < photoJsonArray.length(); i++){
JSONObject photoJsonObject = photoJsonArray.getJSONObject(i);
GalleryItem item = new GalleryItem();
item.setId(photoJsonObject.getString("id"));
item.setCaption(photoJsonObject.getString("title"));
if(!photoJsonObject.has("url_s")){
continue;
}
item.setUrl(photoJsonObject.getString("url_s"));
items.add(item);
}
}
|
JSON数据解析过程